🌞Summer Self-Tanning 101: How to Get the Perfect Glow (Without the Streaks)
- pr3197
- May 8, 2025
- 3 min read
Updated: May 8, 2025
By Kelly Teague | KellyStyleCo.
Let me tell you how this post was born…
This week, my friend Stetson called me in a mini panic. She had just bought her first self-tanning kit and said,
"Okay, I got the stuff… but now what?! I have no idea where to start!"
As I talked her through the process step by step, it hit me — so many women are buying self-tanners, but no one’s walking them through the prep, the application, and the post-care.
So here it is: your full glow-up guide to self-tanning like a pro.
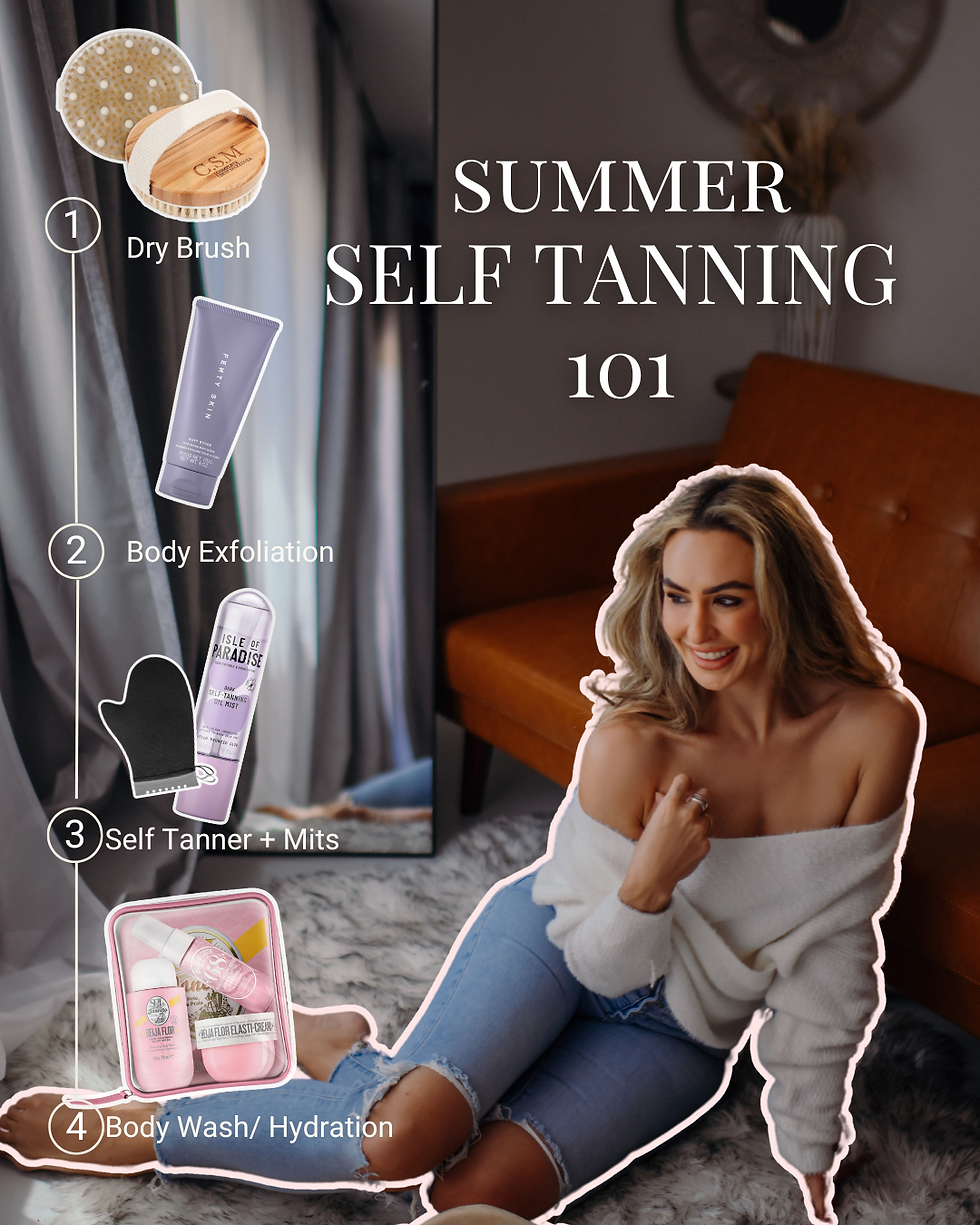
✨ STEP 1: Start with a Dry Brush (Before You Shower)
Prepping your skin is everything. You can have the best self-tanner in the world, but if your skin isn't prepped properly, it can still turn out streaky or patchy.
🖌 Use a dry brush in long sweeping motions toward your heart. Focus on:
Knees
Ankles
Elbows
Folds of skin (like armpits, inner thighs, etc.)
Dry brushing stimulates circulation, removes dead skin cells, and smooths the skin for even product absorption.

🛁 STEP 2: Exfoliate in the Shower
After dry brushing, hop into the shower and exfoliate manually using a sugar-based body scrub.
Why sugar? It's gentle but effective, and won’t leave behind any oily residue that could block the tan from adhering.
💧 My go-to combo:
Fenty Skin Buff Ryder Body Scrub – gentle, hydrating, smells amazing
Sol de Janeiro Brazilian 4 Play Body Wash – creamy, foamy, leaves skin super clean
Scrub in circular motions, paying extra attention to dry areas! Get the ankles, knees, and folds of the skin.

🚿 STEP 3: Dry & Prep — NO Lotion!
When you get out of the shower, pat skin dry completely.
✅ Key tip: Your skin must be dry and bare. No lotion, no oil, no deodorant.
Wait at least 10–15 minutes after your shower to let your skin fully dry. You want a clean, dry canvas for your tan to stick evenly.

Click the image above to view all of the details, but this is hands down one of my favs!
☀️ STEP 4: Time to Tan — With a Mitt, Always!
Let’s talk application.
⭐ Favorite product: Isle of Paradise Dark Tanning Water Mist: It’s lightweight, smells great, and gives the perfect olive-toned bronze (no orange here).
🔄 Application Order:
Spray product onto a tanning mitt — never directly on skin.
Use buffing circular motions to apply:
Start at thighs, work down to ankles
Lightly sweep over knees and feet
Apply to midsection, chest, shoulders
Do arms, wrists, and hands
Finish with a light buff over neck and face
👉 On joints (knees, elbows, hands, feet): Use what’s left on the mitt — no extra product.

💁🏼♀️ STEP 5: Face Tanning Tips
When it comes to your face, less is more.
✅ Only tan the high points of your face — where the sun naturally hits:
Forehead
Cheekbones
Nose
Chin
Avoid over-applying around the mouth, jawline, and eyes. Blend lightly into the hairline and under the chin.
⏳ STEP 6: Let It Develop + Glow
Let the product develop for 4–6 hours.
My routine:
Apply in the evening
Let it settle
Optional: apply a light body lotion on top before bed
In the morning, rinse off for a perfect glow.
💡 PRO TIPS
✔ Wear loose clothing during development
✔ Avoid sweating or showering during the set time
✔ Sleep on dark sheets if possible
✔ Touch up every 5–7 days with a lighter application or face drops
🎯 Shop My Full Self-Tan Routine
Everything I mentioned is linked on my LTK, so you can shop the entire process from dry brush to glow.
💬 Final Thoughts
Getting that sun-kissed, healthy glow doesn’t have to be complicated. With the right prep, application, and tools — you can glow all summer without a single streak in sight.
Have questions? Drop them in the comments or DM me on Instagram @KellyStyleCo — I love helping women feel confident in their skin!
And if you’re not on my GLOW List yet... what are you waiting for?💌 Join here for exclusive tips, giveaways, and beauty secrets every week!


Comments